
Note
Go to the end to download the full example code.
Nested Viewboxes#
Simple test of nested viewboxes, demonstrating the three methods that can be used by a viewbox to provide clipping.
In the root scene are two viewboxes: the left viewbox uses the ‘viewport’ clipping method and a PanZoomCamera, whereas the right viewbox uses the ‘fbo’ clipping method and a base Camera (null transform).
Each of these viewboxes contains again two viewboxes, with the same differences. In this way we test embedding each type of viewbox inside each type.
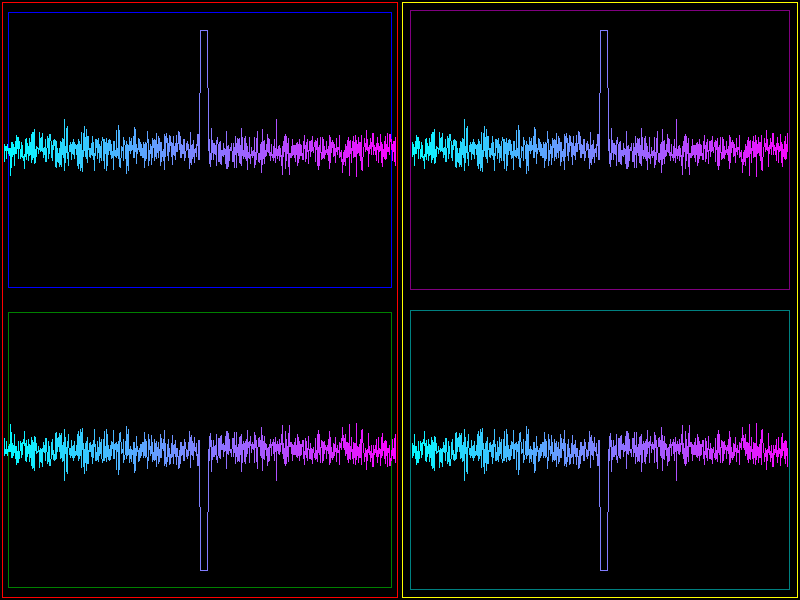
This is what it should look like:
The plot line has a “marker” region on the left side that points in the +y direction. In pixel coordinates, this is normally expected to point downward (because the pixel y-axis points down). However, the default behavior for PanZoomCamera is to reverse its internal y-axis relative to its parent.
+y upward
+y upward
+y downward
+y downward
from __future__ import division

import numpy as np

from vispy import app
from vispy import scene

# gloo.gl.use('desktop debug')


# Create lines for use in ndc and pixel coordinates
N = 1000
color = np.ones((N, 4), dtype=np.float32)
color[:, 0] = np.linspace(0, 1, N)
color[:, 1] = color[::-1, 0]

pos = np.empty((N, 2), np.float32)
pos[:, 0] = np.linspace(0., 1., N)
pos[:, 1] = np.random.normal(loc=0.5, scale=0.03, size=N)
pos[N//2:N//2+20, 1] = 0.9  # So we can see which side is up


# Create canvas
canvas = scene.SceneCanvas(size=(800, 600), show=True, keys='interactive')

#
# Create viewboxes on left ...
#

w, h = canvas.size
w2 = w / 2.
h2 = h / 2.

# left (+y up)
vb1 = scene.widgets.ViewBox(parent=canvas.scene, name='vb1',
                            margin=2, border_color='red')
vb1.pos = 0, 0
vb1.size = w2, h
vb1.camera = 'panzoom'
vb1.camera.rect = (0, 0, 1, 1)
vb1.camera.interactive = False

# bottom-left (+y down)
vb11 = scene.widgets.ViewBox(parent=vb1.scene, name='vb11', border_width=2e-3,
                             margin=0.02, border_color='green')
vb11.pos = 0, 0
vb11.size = 1, 0.5
vb11.camera = 'panzoom'
vb11.camera.rect = (0, 0, 1, 1)
line11 = scene.visuals.Line(pos=pos, color=color, method='gl',
                            parent=vb11.scene)

# top-left (+y up)
vb12 = scene.widgets.ViewBox(parent=vb1.scene, name='vb12', border_width=2e-3,
                             margin=0.02, border_color='blue')
vb12.pos = 0, 0.5
vb12.size = 1, 0.5
vb12.camera = 'base'  # use parent cs
# vb12 does not apply any scaling, so we do that manually here to match vb11
line12 = scene.visuals.Line(pos=pos * [[1.0, 0.5]], color=color, method='gl',
                            parent=vb12.scene)


#
# Create viewboxes on right ...
#

# right (+y down)
vb2 = scene.widgets.ViewBox(parent=canvas.scene, name='vb2',
                            margin=2, border_color='yellow')
vb2.pos = w2, 0
vb2.size = w2, h
vb2.camera = 'base'
vb2.camera.interactive = False

# top-right (+y up)
vb21 = scene.widgets.ViewBox(parent=vb2.scene, name='vb21',
                             margin=10, border_color='purple')
vb21.pos = 0, 0
vb21.size = w2, h2
vb21.camera = 'panzoom'
vb21.camera.rect = (0, 0, 1, 1)
line21 = scene.visuals.Line(pos=pos, color=color, method='gl',
                            parent=vb21.scene)

# bottom-right (+y down)
vb22 = scene.widgets.ViewBox(parent=vb2.scene, name='vb22',
                             margin=10, border_color='teal')
vb22.pos = 0, h2
vb22.size = w2, h2
vb22.camera = 'base'  # use parent cs
# vb22 does not apply any scaling, so we do that manually here to match vb21
line22 = scene.visuals.Line(pos=pos * [[w2, h2]], color=color, method='gl',
                            parent=vb22.scene)

if __name__ == '__main__':
    app.run()
Total running time of the script: (0 minutes 0.716 seconds)